Autonomous Docking
Run continuous operations while the Burro docks to maintain charge—day and night—using trained routes and a scheduled docking window.
Before You Begin
Dock powered: Transmitter power switch ON, charger selector set to Dock (LEDs blink green with power, solid green while charging).
Robot config: Software 6.13+, speed slider ≤ 1.2 m/s.
UI mode: Harvest Assist enabled:
Settings → Manage Profiles & Add-Ons → Main Screen → Harvest Assist.Dock calibrated: The dock position is calibrated, so you know exactly where to start the docking route.
Train Routes
Start Training
Tap the route icon (bottom-right).
Select a Teach slot to begin training.
While teaching, Burro follows you and records GPS waypoints and/or visual/LiDAR cues. After teaching, Burro can run the route autonomously.
Teach the Docking Route
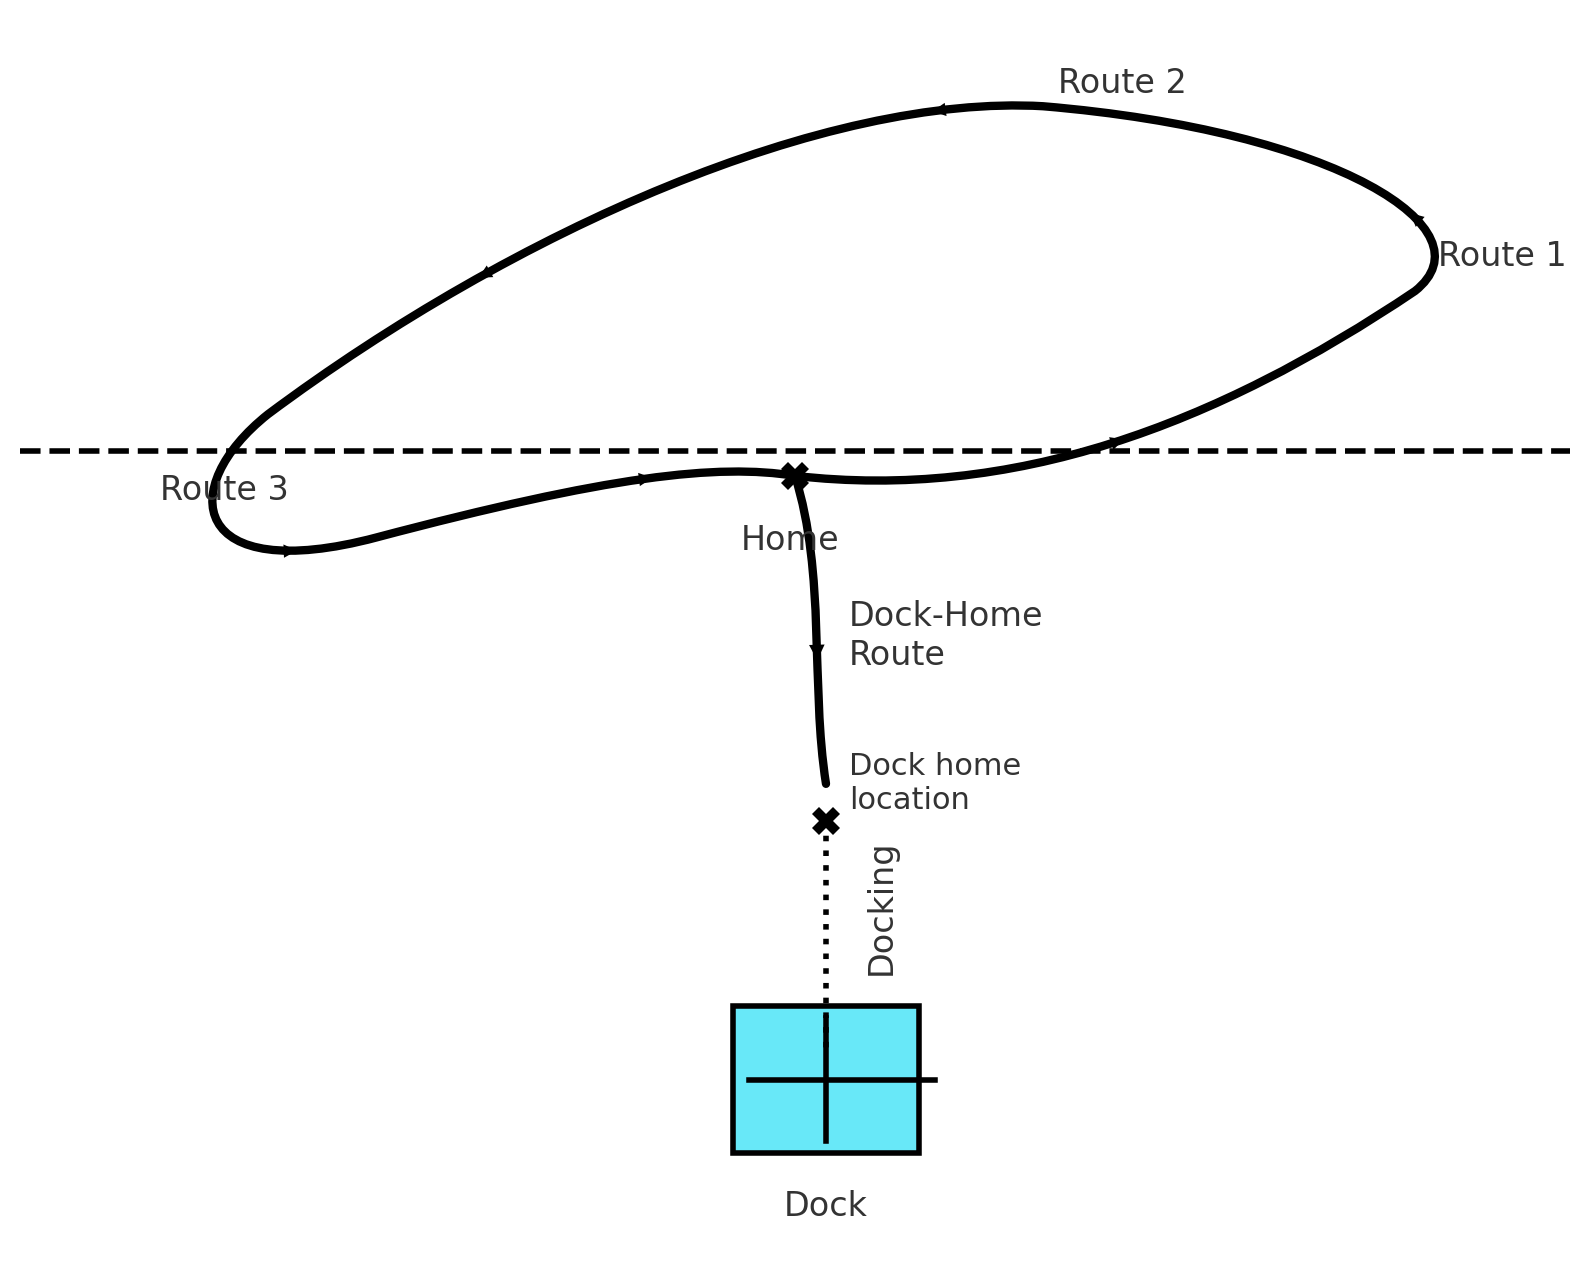
A short, precise approach path that brings the Burro from a known staging point to the dock face, then backs it out to resume work. It’s the “on/off ramp” for charging.
Ensures the robot arrives at the exact approach angle and distance the dock needs.
Anchors the entire autonomous loop (finish work → dock → recharge → leave dock → continue work).
How to set it up:
Teach it once and save it to slot #5.
Set Direction: Two-way (so the robot can both approach and depart the dock on the same route).
Start position: Begin teaching ~3–4 m in front of the dock, centered on the approach.
Keep it short, straight, and obstacle-free for reliable docking.
Behaviour
After all work routes run, the Burro switches to the Docking Route to approach and initiate docking.
When the Time to Dock elapses, it uses the same route in reverse to leave the dock and resume work.
Teach Navigation Routes (work routes)
Operational “work” paths the Burro runs between charging sessions—e.g., scouting passes, patrols, or other tasks.
Define the actual work the robot does while away from the dock.
Give you structured, repeatable coverage with predictable battery usage.
Set Up
Save work routes into slots #1–#4.
Set Direction: One-way.
Ensure the start and/or end of each Navigation Route connects to the Docking Route’s start point (or chains into another Navigation Route that ultimately returns to the docking-route start). This is what lets the robot finish work, then cleanly transition to the dock.
Behaviour
The robot runs routes 1 → 4 in order.
Only after all Navigation Routes are complete does it go to the Docking Route (#5) to charge.
After charging, it departs the dock on the Docking Route (reverse) and starts the sequence again.
Configure Docking Behavior
Go to Home → Burro icon (top) → Docking Settings.
Set Time to Dock (the duration Burro should remain charging when it docks).
Behavior:
Burro completes all routes in the list (slots 1–4) before docking.
After docking, Burro remains on the dock for the selected time, then resumes operations.
Plan route lengths so the robot won’t deplete the battery before it can return to the dock; ensure the dock time is sufficient to recharge between runs.
Run It
Place the Burro at the start of Route 1.
Tap that route to begin autonomous operation.
Burro will run the routes in order, dock for the configured time, and continue the sequence.
Notes & Tips
If any step of docking is inconsistent, re-check dock calibration and route alignment (docking route start ~3–4 m in front, centered).
Navigation routes must remain in slots 1–4 and be one-way; the docking route must be in slot 5 and two-way.